
The Graduate class is fortunate in that there is an "open sailmaking" rule. This means that any sailmaker may produce sails for the Graduate, so long as they "measure".
This creates a healthy competition between sailmakers to create the best performing triangles, at competitive prices.
The main sailmakers are listed below, with short rundowns of their pro's & con's...
Pinnell & Bax (P&B)
P&B Sails have won the nationals every year since 2015. Need I say more?
A nice deep main helps give you plenty of power.
RRP: Jib £296.80 / Main £707.31 (often discounted - check website)
Rooster
Coming from the guy behind the "Roosterized" Grad, these sails have fallen slightly out of favour since Steve moved on from the class.
RRP: Jib £259.99 / Main £600 (often discounted - check website)
Morgan Sails
A sailmaker with perhaps less pedigree than the big brands, but gaining popularity in recent years - is this just down to the price?
RRP: Jib £250 / Main £570
HD Sails
Jim Hunt & Andy "Taxi" Davis are well established in many fleets.
They haven't quite cracked the Grad fleet yet, but we do see the occasional boat sporting HD Sails.
RRP: Jib £330 / Main £830
North Sails
With a 2nd at the 2018 nationals, and 4th in 2019 - a set of Norths are far from the worst thing you could throw at your boat.
RRP: Prices not listed - contact North Sails for a quote
Edge Sails
Edge tends to make a slightly flatter cut sail, which would be good in very light or very windy conditions.
RRP: Prices not listed - contact Edge Sails for a quote
Tim Harper
Tim has gone a little quiet since his nephews Ben & Gabe moved on from Grads - the boys never lacked pace with his sails.
RRP: Prices not listed - contact Tim for a quote
(Prices listed above correct at time of posting, however they may change - check sail loft websites for the latest sail price)
by Adrian Baker
The rig is the 'engine' of your boat and the controls are the 'gears'. Of course, it would be nice if one's boat had an automatic gearbox, but instead we are stuck with lots of bits of string and cleating devices. Knowing how to use the controls is important if you want to go fast in all conditions, and on all points of sailing.
Most Grad sailors who have been doing the circuit for some time will have their own individual theories of how to set up their boat, and which string to pull and when. In fact, with practice, turning a mark and moving on to a new point of sailing sounds little alarm bells with me which say 'look at the rig and pull some strings'
The principal controls which govern speed affect the mainsail shape. The interaction of main and genoa is important, but generally there's not much one can do when sailing to alter this relationship, apart from pulling in the sheet a bit harder, or releasing it a fraction.
Sheeting points can be set up at the start for any particular wind strength, by reference to the luff telltales. The interesting bit is the mast, which is bendy; the mainsail, which is stretchy; and the controls which tension the edges of the sail and affect the straightness of the mast. So how much one pulls (tensions) the controls and which ones at which time is the real secret. The principal things which one can play, and how they affect mast and sail shape, are as follows - remember that generally a full sail equals more power; flatter sail equals less power.
This is the lower to middle mast bend, induced by rig tension and controls mainsail fullness in the lower two-thirds of the sail. Prebend is largely controlled by the degree of spreader 'sweep back'. More sweep = more prebend; less sweep = less prebend. The case with which this can be achieved is dependent on basic spar stiffness and position of the jib halyard sheave box relative to shroud pin position, the greater the distance the easier it will be to bend the mast. These positions are normally fixed and out of our control but there will be differences on different masts. So, to achieve a given measured amount of prebend, two different masts may require different degrees of sweep back.
The kicker is used to control mainsail leech tension, it also has the affect of bending the topmast above the shrouds as tension increases. This consequently flattens the upper third of the mainsail very effectively and has a decreasing effect downwards.
This affects the mainsail fullness, particularly in the lower third, it also affects the 'cup' to windward in the leech - a feature which can help pointing in some conditions.
A luff tensioning device, used to control horizontal wrinkles in the mainsail near the luff following mast bending. Tensioning the cunningham pulls draught forward and relieves leech tension, which can be beneficial in strong winds.
Tension Rating:- (no not nervous tension, but looking at the chart it could be!) : 0= no tension to 5= lots of tension
Points of Sailing:- B=Beating/close hauled; R=Reaching; Ru=Running
|
Light Airs |
Light - Mod |
Moderate |
Mod - Fresh |
||||||||||
| Approx Wind Force |
1/2 - 1 |
1 - 2 |
2 - 3 |
4 - 5 |
|||||||||
|
Controls |
|||||||||||||
| Points of Sailing |
B |
R |
Ru |
B |
R |
Ru |
B |
R |
Ru |
B |
R |
Ru |
|
| Prebend (rig tension) |
5 |
4 |
2 |
3 |
2 |
2 |
2 |
1 |
0 |
4 |
2 |
2 |
|
| Kicker |
1 |
2 |
1 |
2 |
3 |
2 |
3 |
4 |
3 |
4 |
5 |
4 |
|
| Outhaul |
4 |
3 |
4 |
3 |
2 |
3 |
2 |
1 |
3 |
5 |
4 |
5 |
|
| Cunningham |
0 |
0 |
0 |
1 |
2 |
0 |
2 |
2 |
0 |
4 |
2 |
0 |
|
It would be interesting to hear if this table works for others
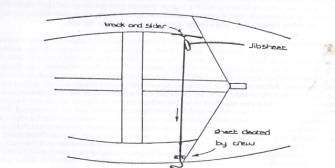
The latest design in jib pole technology allows the pole to be hoisted or dropped by pulling or releasing a line at the base of the mast. This means the crew does not need to stand up during hoisting or dropping, the pole can be carried longer, and as an added bonus, the pole may be partially hoisted to leeward on reaches to control the jib leech, replacing the barber hauler.
Flyaway jib poles can be done on a budget using aluminium tube, or for the racier sailors, carbon fibre poles give a super-light, super-stiff option!
Ready to fit kits can be purchased using the links below:
With goosewinging on a run now becoming effortless, adjusting the jib leech tension on reaches is now also possible - see the advice below for a quick "how to" guide:

Whether you are updating an old Graduate, or fitting out a new hull, the information contained in here should provide a basis for a successful racing dinghy. The measurements given should be taken as a starting point, from which fine adjustments can be made to suit the individual. In some cases, precise settings cannot be given due to the scope for variation in hull/rig measurements in the class rules, so it is advisable to check measurements with those of other boats whenever possible, as a further reference.
To prevent this piece becoming a large book, it concentrates as much as possible on measurements and advice specifically for the Graduate, how things should be done, rather than why. To find out the principles of rig tuning, I suggest that you read books on the subject. A book which explains tuning fairly simply, and in logical steps is 'Tuning your racing dinghy', by Lawrie Smith. Another useful source of information is magazine articles such as those published in Yachts and Yachting, which usually concentrate on one particular area of boat tuning.
When explaining the things which will make your boat go faster, we will presume that certain points are in order:
(1) The hull is sound and not likely to give under the stresses imposed when sailing.
(2) All fittings are securely fixed (preferably bolted) to the boat, and will not pull off or move.
(3) The boat does not have a wooden mast, as this makes rig tuning impossible.
(4) The boat owner is a member of the class association and has a current racing certificate for the boat, without which it should not be raced.
Before you start trying to set your boat up to go faster, there are a few basic points which you should consider. Without this preparation any time you spend tuning the boat may well be wasted.
First you should make sure that the boat is fitted out symmetrically about it's centreline. Most importantly, the shroud plates should be equal distances from the stem fitting. and the mast step should be located the same distance from either shroud plate (i.e. exactly on the centreline).
Probably the most important (and most ignored) area of the boat is the bit that goes in the water. The hull finish is not as important to boatspeed as most people think, as long as the hull is fair and sound, a smooth paint finish is not necessary. However the centreboard and rudder must be exactly parallel to each other (i.e. in the same plane). If they are out of line the foils will work against each other causing excessive drag, and slowing the boat considerably.
For this reason, if for no other, the centreboard and rudder must be as tight a fit as possible in the case and stock respectively, so that they cannot move sideways at all under pressure, and so become out of line. It is also a good idea to check that the centreboard can go fully down (just forward of vertical) otherwise the boat will point badly when beating.
Regarding the rig. If there's anything seriously wrong here, it can usually be spotted easily, so it doesn't need to be covered here in any detail. However, do make sure that the mast and boom are not permanently bent (which is out of class anyway) and that the shrouds are both the same length. Finally, make sure that the mast is a tight fit in the mast step, and cannot be twisted at all. To prevent any movement here, tighten the mast step bolts immediately in front and behind the mast heel. If the mast is very loose in the step, packing pieces should be fitted inside the step either side of the mast heel.
Now that any basic faults with your boat have been corrected, you can begin setting the boat up. Starting with the rig, the first thing to establish is the mast rake, because if you change the rake, everything else (such as spreader deflection, jib sheeting angle, etc.) changes as well. Mast rake is largely a matter of personal preference; although everyone sails with the mast raked slightly aft of vertical, there are visible differences in rake between the boats at the front of the fleet. The best way to get roughly the right mast rake is by hanging a weight from the main halyard, when the boat is level fore and aft and the jib halyard is tensioned a little. The main halyard should then hang 18cm aft of the mast at gooseneck height. As a further guide, when sailing in light weather, the boom should be horizontal or sloping slightly upwards towards the aft end. Don't feel that you have to keep strictly to these guidelines; if the rig looks or 'feels' wrong when you're sailing, don't be afraid to change the rake a little at this stage.
Having decided on a mast rake position, you can now start work on other parts of the rig. Probably the first thing that people think of when you mention tuning is the spreaders. Ideally you should have screw adjusters fitted so that the spreaders can be positioned accurately:
However it you don't have that luxury, the spreaders will have to be set by estimating their optimum position, bearing in mind how full your sails are, what crew weight will be in the boat, and how stiff the mast section is to begin with. As an example, with a Proctor 'C' section mast (the most common section in the Graduate fleet), the spreaders should be set so that they deflect the shroud forwards 4cm, and outwards 2cm from it's straight line position, when sailing with a crew weight of about 20 stone. (Note, for most Graduate masts it is not advisable to deflect the shroud outwards more than 4cm, even for heavy crew weights, because when the jib halyard is tensioned, the mast will tend to bend sideways uncontrollably, causing a loss of power, particularly when reaching). As with the mast rake, these spreader settings are only guidelines, which will vary depending on how full your sails are (flatter sails require less deflection and v.v.). lighter crew weights and boats with stiff masts (Proctor kappa) and/or full sails will need shorter spreaders, raked further aft, the opposite applying to boats with bendy masts (Needlespar, and Proctor Alpha or Lamda) and/or flat sails.
Simply bolting the spreaders like this is inaccurate and difficult to do. If the screw adjusters mentioned previously are fitted to the spreaders, a lot of these problems can be avoided. Before setting the spreader angle you should cut the spreaders to the required length, so that the outwards deflection is set (as above). To set the spreaders with the right amount of fore and aft deflection, you ideally need to go sailing in medium winds, where both helm and crew are sitting on the sidedeck, but the boat is not overpowered. Before you go out, both spreaders should be set to the same angle, so that the mast doesn't bend differently on either tack. To do this put the mast up without the shrouds attached to the spreaders, arid use the screw adjusters to set the two spreaders so that the aft edge of the spreader just touches the shroud. The spreader ends can now be reconnected, and the boat rigged. Tension the jib halyard fully (you should get 400lbs of tension on the shrouds), make sure that the main halyard is tight enough to remove any small wrinkles from the luff of the mainsail. Tension the outhaul, so that a crease begins to appear along the foot of the sail. You should now sail the boat closehauled, and, without tensioning the kicking strap or cunningham, pull hard on the mainsheet until the leach of the mainsail becomes tight (the leach telltale at the top of the mainsail will stop streaming off the sail). The mainsail will probably now have large creases running (tom the clew to the mast at about spreader height.
It these creases don't appear, rake the spreaders aft until they do. You must now move the spreaders forward a little (say 2 turns on each adjuster), and tension the mainsheet again to see if the creases still appear. If they do, move the spreaders forward another 2 turns and check again. Continue this procedure until the creases just disappear. The mast is now bending the right amount to suit your mainsail. and the spreader adjusters can now be marked and left in this position. This spreader angle can only be improved further by making minor alterations for different wind strengths; for light winds the spreaders should be raked aft a little (and lengthened a little, if possible) and for heavy winds, they should be raked forwards more (and shortened). However such alterations make little difference to boatspeed and I suggest that you forget about them, at least to begin with.
The next point to consider is the jib sheeting position. A lot has been written on this subject in the last few years, and I suggest that you read about it elsewhere to get an understanding of the theories involved. However as a starting point, for the Graduate in particular, the jib fairlead should be 23cm inboard from the shroud and roughly 175cm from the stem fitting, where the jib is attached. The tack of the sail should be shackled here, within an inch of the very front of the boat, and should be secured close enough to the deck that when the sail is sheeted in, the foot touches the deck along most of its length. The jib halyard should also be tensioned, before the fairlead position is set.
Basically the sail is set correctly for medium winds when, as the boat is luffed gently above closehauled, the jib begins to back at the same moment all the way up the luff. If the lower part of the luff begins to back first, while the top is still full, then the jibsheeting position should be moved aft (or up) but if the upper part backs first move the sheeting position forwards (or downwards). Moving the fairlead fore and aft can then set the sheeting position for light and heavy winds.
Because of the need for easy adjustment of the fairlead position, and for a close sheeting angle, it is difficult to fix a track and fairlead (as found on other classes) in the right place. See the separate jib sheeting article for further details.
| In recent years, it has become commonplace to move jib fairleads inboard to improve pointing. Historically, Graduates used fairleads mounted on the side deck, with the cleat positioned on the opposite (windward) side. Many methods have been devised to alter the effective sheeting position. The exact distance inboard will depend on personal preference, deck layout, and the cut of sails; as a starting point, the block should be positioned 23cm inboard from the shroud, and about 175cm from the stem fitting. |
 |
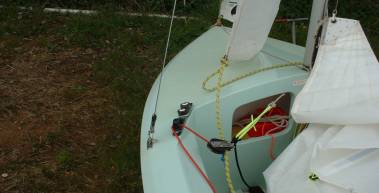 |
This shows a common modification made to a standard Wyche & Coppock Supergrad. The existing fairlead is used to control (via red control line) the athwartships position of the ratchet block. Additional lines (blue, just visible, and black) are required to control the height of the block. Shockcord is used to hold the block in place, and to stop tangles.
|
|
This shows a wooden boat with a similar setup, with perhaps more adjustment possible. The control lines are held by cleats. This arrangement does, however, limit the space available for the crew to sit, particularly in light weather.
|
 |
| These pictures illustrate more permanent solutions, involving some modification to the deck layouts of a GRP Supergrad (far right) and an Alpha. Note the jib is cleated on the leeward side, which some may find more convenient. The cut of the jib may cause problems; if the foot of the jib is too long (or the jib too low on the forestay), there may be insufficient distance between jib tack and the block. |   |
 |
For Sprinter GRP boats, moulded fairlead platforms are available from Butler Boats. These may well fit other deck layouts. |
 Our 2024 calendar is filling up...There are still a few events to be confirmed, so keep checking back for updates!
Event
Location
Dates
Sailjuice - King George Gallop
King George S.C.
20th January
Steve...
Our 2024 calendar is filling up...There are still a few events to be confirmed, so keep checking back for updates!
Event
Location
Dates
Sailjuice - King George Gallop
King George S.C.
20th January
Steve...